Interesting Winter Craft ideas
- Jan 3, 2024
- 5 min read
Updated: Jan 9
Winter holidays are like a big, cozy blanket of magic sprinkled with twinkling lights and joyful anticipation. It's a time for family, feasts, and festivities, and what better way to capture that spirit than by getting crafty with the kids? Winter holidays are the perfect time to unleash your inner creativity and create something together
Here are some tried and tested Craft activities that can easily be done by kids with very little help so go overboard and discover the joy of creating !!!
1.Wreath making
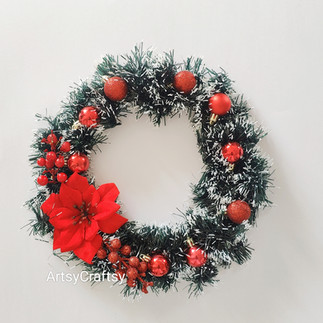
Wreath making is a fun and interesting craft idea for winter holidays. One can create different styles depending on the materials available- pine grass, net , variety of christmas ornaments, hollyhock leaves, berries, bells and so many ornaments are available in market that one can choose from.For the base one can buy wreath rings available in markets or use the rim of a sturdy paper plate on which ornaments can be glued.
Heres the link for readymade wreath base :
These are made on paper plate rims cutout, so you can see if one uses sturdy paper plate one can create different assembles on it
2. Bottle painting
Materials you will need :
Any bottle (cleaned and dried)
Spray paints
Acrylic paint in white, black, orange, and any other colors you want to use
Paint brushes in various sizes
Pencil
Clear acrylic sealer (optional)
Prime the bottle by using spray paint of your colour choice Let the spray paint dry completely before moving on.
Draw the winter theme drawing outline, it can be snowman, gingerbreadman, gingerbread house, christmas trees, snowflakes . Use a pencil to sketch lightly
Paint the design using acrylic paint.
Spray white paint using old tooth brush to give snowfall effect
Seal the paint (optional). If you want to protect your paint job, you can apply a thin layer of clear acrylic sealer. Let the sealer dry completely before displaying your finished winter or christmas theme wine bottle.
Decorate by tying jute rope or ribbons on top with hanging ornaments or embellishments
You can also put cork fairy lights
Here are some additional tips for painting snowmen on wine bottles:
Use a fine-tipped paint brush for the details, such as the eyes and mouth.
If you make a mistake, you can use a cotton swab dipped in nail polish remover to carefully remove the paint.
Let the paint dry completely between coats to avoid smudging.
Have fun and be creative! There are no right or wrong ways to paint
3.Learn to make Paper Stockings
Materials required
Red ,green white paints
Scissors
Glue
Pencil
Hole punch (optional)
Ribbon or string (optional)
Instructions:
Cut out the stocking shape:
Use the pencil to trace a stocking shape onto the cardboard. You can find templates online or freehand it.
Cut out two stocking shapes from the cardboard.
Paint the template with paints and patterns of choice
Decorate the stocking with shiny stars and stickers
Punch hole on the sides and string a ribbon or wool along sides so that it becomes like a pouch Thread a ribbon or string through the hole for hanging
Tips:
You can use different colors and patterns of paper to personalize your stocking.
If you don't have cardboard, you can use thick paper or fabric.
Get creative with the decorations! You can add buttons, sequins, or other embellishments.
Have fun making your Christmas stocking!
For full video tutorial visit the link : https://youtu.be/I5kFF_a12w4?feature=shared

Other design for stocking : Buffalo check pattern can be done on wooden cutouts or canvas fabric stockings

4. Winter theme paper buntings
Materials:
Red and white felt sheets /or craft foam sheets or chart papers
scissors
Ribbon (optional)
Instructions:
Cut out the mittens shape from your choice of material- felt , craft foam or chart paper
Embellish the mittens (optional):
You can add buttons, snowflakes, or other embellishments to the mittens using glue or thread.
String the mittens on the yarn:
Tips:
You can use different colors and patterns of felt for the mittens
Get creative with the embellishments! You can add anything you like to personalize the bunting
Here are some additional ideas for variations:
You can make buntings with different designs- snowman , christmas trees, gift boxes, stockings and many more so let your creativity and imagination go wild and discover the joy of creating


5. Buffalo Check painting on wooden bases
Variety of MDF cutouts are now a days available in market locally or online shopping portals
Here are few links from where one can get beautiful raw bases ;
Or one can use old trays, or wood bases to paint buffalo checks to give festive look
Painting buffalo checks, also known as lumberjack plaid, is a fun and a very engaging activity for kids especially 8+ yrs. Here's a basic guide to get started:
Materials:
Surface to paint: This could be anything from a canvas or wood panel to furniture or even a wall.
Paint: Choose three contrasting colors of acrylic paint. Classic buffalo check uses black, grey and white, but you can get creative with other color combinations like Red Maroon and Black , Green , dark green and black and so on
Paint brushes: You'll need a variety of sizes, depending on the size of your project. A small roller can also be helpful for larger areas.
Painter's tape: This will help you create clean lines for your checks.
Pencil and ruler (optional): These can be helpful for marking out your checks if you want them to be perfectly even.
Instructions:
Prepare your surface.( optional , required only if you are using old wood piece) If you're painting on wood or furniture, you may want to sand it lightly first to smooth out any rough edges. Then, prime the surface with a coat of acrylic gesso or primer. This will help the paint adhere better
Mark your checks. You can use your pencil and ruler to mark out the size and spacing of your checks. Try to divide the entire surface equally so that checks are equal
Apply painter's tape. Use the painter's tape to create the stripes for your checks. Make sure the tape is pressed down firmly so that no paint bleeds through.
4.Paint the checks. Paint the alternating squares with your color.s Use a light touch and be careful not to get paint under the tape. Let the paint dry completely, then carefully remove the tape.
Now stick tape to another line and paint alternately with different colors , continue till to finish painting the whole surface.
Leave it to dry, now choose a stencil of your choice and dabb white paint to create design over it .
To buy quality stencils visit shop section of our website: Here's the link : https://www.artsycraftsy.in/collections/stencilsTo see the right way to do stencilling watch this video tutorial here:
Enjoy making amazing home decor pieces.
.png)


Comments